Tuesday, 29 January 2019

Learning environments - SPACE AND TIME (Part 1/9)

How does the learning environment enhance Creativity?

The theory and practice of Teaching for Artistic Behaviour (TAB) is based on the following 3 beliefs: 
  • What do artists do? 
  • The child is the artist. 
  • The classroom is the child's studio. 

When you look around your classroom, what do you see?
Put yourself in the shoes of your students and examine the walls - how do they make you feel? are they helpful, inspirational, over-stimulating?

Examine the workspaces/centres - are these inviting, exciting, confusing? Would you know what to do, how to start or clean up? Can you find what you need? Is the lay out clear or confusing?

Furthermore, put yourself in the shoes of someone who is shy or timid, exuberant, easily overstimulated, reliant or independent. Now how does your room support their learning styles?

And how can our classroom - the child's studio - enhance Creative Thinking


Continuing with my literature review of
Lai, E. R., Yarbro, J., DiCerbo, K., & de Geest, E. (2018). Skills for Today: What We Know about Teaching and Assessing Creativity. London: Pearson.


LEARNING ENVIRONMENTS 
Davies et al. (2013) identified the following 9 environmental factors as supporting the development of creative skills in students: 
  • flexible use of space and time (1/9)
  • availability of appropriate materials (2/9)
  • working outside the classroom/school (3/9)
  • playful or games-based approaches with a degree of learner autonomy (4/9)
  • respectful relationships between teachers and learners (5/9)
  • opportunities for peer collaboration (6/9)
  • partnerships with outside agencies (7/9)
  • awareness of learners’ needs (8/9)
  • and non-prescriptive planning (9/9)

FLEXIBLE USE OF SPACE AND TIME (1/9)
Having flexible use of space within the classroom or studio can promote students’ creativity and imagination to support the growth of ideas (Bancroft, Fawcett, & Hay, 2008; Jeffrey, 2006, cited in Davies et al., 2013).
For example, not using specifically themed role-play areas and props in early-year settings gave more freedom for the students’ imagination (Bancroft et al., 2008).
Flexible seating options or learning spaces in classrooms has gained a lot of attention from teachers in recent times.

This news article on making a change can be accessed here (source of image above)
goodbye-desks-hastings-classrooms-add-flexible-learning-spaces  

The internet (instagram, Pinterest) is filled with surreal images of beautiful furnishings and compliant students in clean open spaces that are more beautifully decorated than most people's homes. However the reality is a little different.
https://pixabay.com/en/photos/classroom/
While the tide is shifting away from rows of desks and students working individually, to embody a more relaxed, homely atmosphere where students collaborate and drive their own inquiries, most classrooms are tired looking with scuffed furnishings and hand-me-down accessories. Teachers around the world spend their personal income to decorate and supply their classrooms, creating alternative seating by purchasing gym balls and upholstering crates in colourful fabrics or painting wall murals and decorating notice boards. Lack of available finance drives teachers to think creatively and problem solve around such obstacles, driven by the passion to provide the the best possible environments for their students.

Based on research, I paired or grouped the long art benches in my classroom. I also requested for 3 to have had the legs cut down and this created a large communal work area that caters for students as young as Kindy.

Students select their seats but know that they will be asked to reselect if their own choice was not working for them on that day.
The only determiner to seating is that the room is divided into wet media / dry media zones based on the proximity to sinks. Supplies are stored in a central location,  students collect and take these to their chosen work area in the zone. This way the use of tables can change based on the year level, club group or media in play.

Work tables with Y1 Art Club - Liquid Tempera Paint

Work tables with Y0 Class - Painting ceramic fish with liquid water colours (NZ dye)


Work tables with Y3/4 enrichment collaborative - wax and water colour (dye) resist

Work tables with Y6 PYP Exhibition Elective group - pour and flow abstract work with diluted acrylics
Work tables with Y5 drawing media

This set of 2 work tables is permanently set up as a ceramic centre due to the dust and media specific requirements

The mat area also converts to a construction zone for cardboard sculpture and papier mache armature making. I moved a large bookcase containing construction material to border the mat on one side. The fibre centre storage is also in this area. Along side of the mat is a green screen wall that can cater for digital options.

Mat area with students creating PM armatures

The green screen wall displaying some of the students photographs - alongside the mat zone


I also made an inspiration wall for each zone with images of past student work at multiple levels, doubling as a galley.
Digital Zone

Drawing Zone

Building Zone

Painting Zone


Using TIME flexibly can also play a role in the creativity of young students who need time for immersion in a creative activity (Burnard, Craft, & Cremin, 2006).

Everyone has a personal learning rate that is affected by interest, ability to sustain focus, emotional well-being, skill level, learning faculties, etc. Time limits can add to stress and impact the quality and purpose of the learning.  Teachers have known this for some time as is evident in the multiple 'Early Finisher' option lists flicking around on social media. This is merely a panacea and not a good enough solution.
https://www.google.com/search?q=early+finishers&client=firefox-b-ab&tbm=isch&tbo=u&source=univ&sa=X&ved=0ahUKEwislpHEgZPcAhXJm5QKHfmyDUUQsAQIOQ&biw=1341&bih=671

Consider your students when planning your programme, being cognisant of the fact that students require variable time frames. Extend the core learning intention (understanding that this is all that some will manage) into tendrils of personal inquiry that faster students can select to follow, independently or in collaborative groups. Leave this open ended and self directed for exploration.

One time factor consideration I recently used in my classroom was to...

Vary the paper size:
Y6 (aged 10-11) art students participated in a real community commission this past term. Our client (the developer of a local rail transport hub in Auckland) required artwork about dream destinations that they could print onto square tiles to decorate a wall.
Knowing that students took different amounts of time to initially plan and then to create their work (due to confidence level, idea generation, media chosen etc), I gave them the choice between 2 paper sizes.  For students with intricate and detailed work, time consuming media or techniques and those that started much later, I recommended the smaller paper size but still left the final decision to them. Even so, due to events out of our hands (school wide events like sport that cancelled lessons or student illness), a few students still did not complete but many more did with this one small modification. And completed to a high standard. Every piece is original, designed by the student and media is self selected. Because the work is to be scanned, size is irrelevant to the client but made a huge difference to the students. And I think you'll agree that quality was maintained.

small paper - water colour pencils

small paper - water colour paint and india ink

small paper - coloured pencils
LARGE paper - acrylic paint


LARGE paper - acrylic paint

LARGE paper - water colour pencils

Two tendril extensions I used with this same level was...

Providing a 'hook' centre to follow-on from the core learning intention.

Due to the work above requiring to be 2D, students didn't have the option to create in 3D. As students started to approach completion, I set up a clay centre and strategically displayed work in progress from other year groups, the uptake by students to create with this media was overwhelming.
All I required was for them to watch this short video by The Clay Teacher (see below) as an entry ticket into the centre so that I didn't get tied into supporting exclusively in this area beyond checking in and conferencing on designs as I would anyway.
I shared the link to this little YouTube video with them as a reminder about clay basics (they have used clay the year before) and said they could make anything they wanted with 2 technical criteria - must have a base so that it doesn't topple and follow the joining rules for clay.


I do expand on the joining rules with the Acronym - SWWS (scratch, wet, wiggle, scrape/smooth) to minimise bits falling off as this can be very disheartening for little people.

I also made my own clay flipped video for my younger students based on the coffee cups idea by art teacher, Cassie Stephens.


Some students chose to do further research independently while others created from their imagination.
Here are a few of the pieces that they chose to made.


Other students chose to return to the Prototyping step in the Design Thinking Process that we use and explored other media that they had not used on their work but had seen results achieved by others.
These included, wet and dry media as well as digital media.
Students choosing Osmo for drawing (improves observational skills for accuracy in drawing)
Students as teachers working with a drawing app.

I hope that these ideas and reflections help you to consider the impact of that your learning spaces and time factors have on Creative Thinking, as you plan future learning intentions.


Please continue to my next post on Learning Environments and read about:

AVAILABILITY OF APPROPRIATE MATERIALS (2/9)


With Love
Timea


Thank you for visiting,
http://www.help-me-learn.com/
http://www.teacherspayteachers.com/Store/One-Teachers-Journey
http://www.teachersnotebook.com/shop/tkwillemse
https://twitter.com/TimeaWillemse
http://www.youtube.com/user/HelpMeLearnMaths
http://pinterest.com/tkwillemse/boards/

Friday, 28 December 2018

Exploring strategies for teaching creative thinking Part 4

In my previous post I wrote about how I applied the research of  Anderson and Yates (1999), who taught artistic clay work to six-year-old students using social modelling and cognitive learning principles, to my clay lessons with Y3 and 4 students (age 7-9).

In this post I write about how I scaled it up to Year 5-6 students (aged 10-11), and what I observed.

With older students (Y5/6), I no longer modelled physically. Instead I loaded a you tube video for them to watch and follow independently before they cycled through the clay centre. This was in an effort to further develop both independence and collaboration among the small groups, as well as their decision making/problem solving skills. This video can be found here. 

While this was sufficient for approximately half the students, others still needed my hands on support to work through the process of constructing a figurine. Reasons ranged from lack of experince with the medium, to limited short to term memory retention, to students on learning support for processing disorders.
Independent students personalised their directed work, with much less encouragement, some applying the concepts in the video tutorial to a completely different subject (the video is a guided lesson that produces a bear).
This showed that some students were ready to move beyond the exemplar once it had done the job of visually reinforcing clay work skills learnt previously. These students did not need the practical step-by-step learning, while others still benefited from that.
 

Y5-6 students have choice of media for their Wall / Wow Work (for displays/artshows etc), so not all chose to create with clay following the tutorial centre, but those that did, produced impressive work.

Year 5 - based on inquiry unit Sharing the Planet (IB PYP), animals under threat


Year 6 - Independent and self directed work


What does the research say:
Groenendijk, Janssen, Rijlaarsdam, and van den Bergh (2013) examined ninth-grade students who were taught the same design strategy steps (based on Sapp (1995), involving various divergent (producing ideas and sketches) and convergent (evaluating ideas and making choices) stages. One group also had  observational learning added, where students watched videos of other students completing design tasks which showed work in progress along with 'thinking aloud' through the design steps. Results show that observational learning had a positive impact on creativity, but only for high-aptitude students. For low-aptitude students, creativity improved
equally in both the observational-learning and direct-strategy instruction conditions. (see my noted observations above with the introduction video to clay)

In their study, Yi, Plucker, and Guo (2015) considered how modelling influenced divergent thinking in a sample of Grade 8 students. All groups were asked to complete verbal and figural divergent-thinking tasks, but one group were shown creative models prior to completing theirs. These students produced work product with higher scores on creativity, technical quality, imagination, artistic level, elaboration, and overall impression. Regarding divergent thinking, viewing models positively impacted all three facets of divergent thinking on the verbal tasks (fluency, flexibility, and originality) but not on the figural tasks.

With all this in mind, I started work on a digital resource where I could load videos that can support students in learning centres. These can be videos I make as time permits or ones I link from Youtube. This works mainly for students from Y4 up as they all have personal iPads at school and can easily access on-line resources. For younger students, I would continue to model in small groups, print out exemplar images, show video on the classroom TV monitor and rotate through familiar centres. I include exemplars of work from my own students where possible. As many of the videos have my students in them, I cannot share the link to the site, but I have started linking the public ones to this blog under the Flipped-Learning link at the top.

Once I have used these a bit more, I'll share my observations with you here in a future post :)

Thank you for stopping by,
With love, Te Aroha
Timea
http://www.help-me-learn.com/
http://www.teacherspayteachers.com/Store/One-Teachers-Journey
http://www.teachersnotebook.com/shop/tkwillemse https://twitter.com/TimeaWillemse http://www.youtube.com/user/HelpMeLearnMaths
http://pinterest.com/tkwillemse/boards/
https://www.instagram.com/timea_oneteachersjourney/

Exploring strategies for teaching creative thinking Part 3

In my previous post I wrote about how I applied the research of  Anderson and Yates (1999), who taught artistic clay work to six-year-old students using social modelling and cognitive learning principles, to my own clay lessons with Y1 and 2 students (age 5-6).

In this post I write about how I scaled it up to Year 3-4 students (aged 7-9), and what I observed.

Year 3 were given teacher workshops to develop their understanding of slab work, with applied relief and imprinted textures.

We worked on boat-scapes to compliment their unit on explorers and offered some directed choice options for students to personalise their tiles (e.g. orientate your slab portrait or landscape, this is how you can turn this circle into a sun or a moon then place it anywhere in the sky, or add a second boat/wave if you wish, of your own design, or choose from these 4 texture rollers to imprint your water, etc).


These workshops were followed by an independent session where students were required to create a bird sculpture, continuing the theme of exploration and the applied concept of freedom. The initial intention was to base their birds on the slab technique learnt in the workshop. I supplied students with a number of reference photographs of slab bird sculptures to use for inspiration. However, I also included a few 3D bird sculptures just to see who might be ready / enticed to give that a go.
Bone dry and ready for the kiln


I was impressed by how many did. But still just as many weren't ready to go that next step so it was good to have a range for students to refer to. A range of paint options were also available for finishing after the bisque fire. Students could choose from liquid water colour (dye), tempera, metallic acrylics or left uncoloured and dipped in clear glaze for re-firing.


With Year 4 students (aged 8-9), the teacher directed lessons modelled a cat figurine (tying in with the school production of Aristocats).

As with the Y3 students, Y4 were also given directed choice options to personalise their figurine. These included selecting preferred cutters for the base, the shape of the body and tail position.
I noticed during these teacher directed 'workshops', students were keen to personalize their work at every opportunity and my message was to embrace the uniqueness of their shapes and creations. The steps were a learning guide rather that a requirement and students were left to independently add further personal details for the last 5-10 minutes of their workshops. One student completely personalised his cat into a dog :)

This year group painted their cats with underglaze once bone dry, then they were bisque fired before I glazed and refired them.

I did not model how to apply the glaze so originality and creativity was even more evident in this step as students ranged from realistic designs based on pets they knew, to artistic pattern and colour interpretations. There were no rules but some reference images were provided on the board to indicate a range. None of these were copied, but some students did use the reference images as a starting point.


These workshops were then followed by an independent session where students used the skills they had learnt in the workshops to create a self portrait figurine, to show personal traits, interests or talents.


Students were given very limited time (only a single period) to create these figurines. Despite this constraint, they produced some remarkable and original work. There was a lot of conversation among the students as they supported each other through the making challenge.
This consolidation time was incredibly valuable for learning as students figured out what they remembered (or had forgotten) from their workshops and how they could apply those learnings to new elements that they wanted to create. For e.g. rolling a coil for a cat's tail worked for rolling thinner coils to make locks of hair. Again, the figurines were left to air-dry before under-glazing so there were mishaps with bits falling off. This learning will stay with them for future lessons about the importance of solid joins.
I created a teaching video for making a figurine, following these sessions, and included the elements that were challenging for the students. This video will be available to them next year to review before they start on their next clay artwork, which will be an independently conceived and created piece.  

My next post will detail the lessons and outcomes observed with Y5-6 students .


Thank you for stopping by,
With love, Te Aroha
Timea
http://www.help-me-learn.com/
http://www.teacherspayteachers.com/Store/One-Teachers-Journey
http://www.teachersnotebook.com/shop/tkwillemse https://twitter.com/TimeaWillemse http://www.youtube.com/user/HelpMeLearnMaths
http://pinterest.com/tkwillemse/boards/
https://www.instagram.com/timea_oneteachersjourney/

Tuesday, 18 December 2018

Exploring strategies for teaching creative thinking Part 2

Observational Learning and Modelling:
Of particular interest to me in my teaching area, was whether observational learning or exposure to creative models can enhance creativity, or limit it. For the past year, I have been struggling with this concept because my observations have shown that when a teacher models a completed product for students, they view that as the 'right answer' and may stop pushing the boundaries of their own original thinking. The quality and technical skills of students are however, much improved when they follow a teacher model / recipe lesson. So I was interested to read what the research says about this?

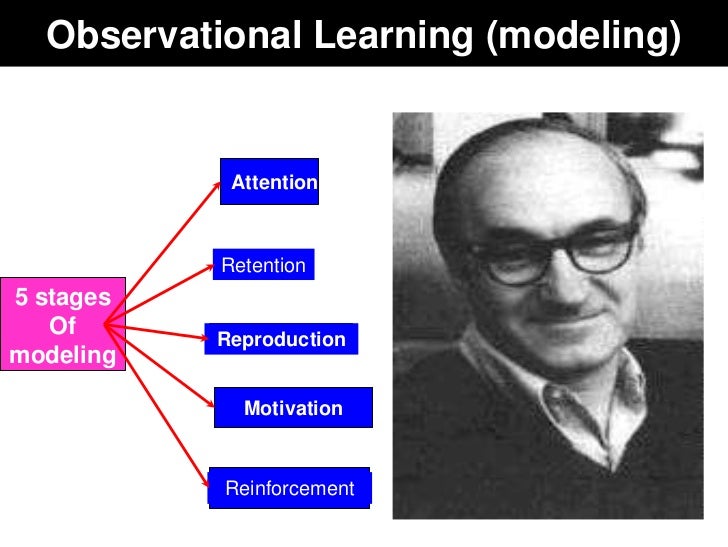
Bandura’s (1986) social learning theory suggests that individuals acquire new skills by watching the work of others. These modelling studies examine creativity through art and design learning.

Anderson and Yates (1999) taught artistic clay work to six-year-old students using social modelling and cognitive learning principles across a six-week period (ninety minutes of instruction per week - for me that would be 2 x 45 min periods). During the class, the teacher modelled techniques for working with clay, verbalizing her actions to give students a vocabulary for discussing clay-modelling processes. The class also involved frequent skill practice. The creative-work products (i.e. clay-work designs) of students receiving the modelling intervention were compared to those of students taught using traditional, non-directive curriculum practices. Results indicate that the modelling intervention had a positive impact on
  • technical competence, 
  • decorative competence, 
  • aesthetic appeal, and 
  • three-dimension approximation. 

Albert Bandura - Social Learning Theory

I only have my students for 8-10 weeks a year so while I tried out this approach for the clay centre with students aged 4-6, I didn't have the extended time that is discussed in the research. But I do get students back each year so I view it as a longitudinal study where we can build on skills each year.
I rotated small groups through a clay workshop each period while the others created independently in drawing and modelling clay centres. We all made the identical object (a teacup and saucer) that covered technical skills of pounding, imprinting, stencil shape cutting, rolling spheres and snakes (coils), forming a pinch pot and attaching with the score, slip (magic water) and wiggle method. Children also solved for incidental problems around the ideal clay thickness for each element and the cracking of clay as it dries out.
The assessment this yielded for me included the students' listening and observation skills, technical application and following sequential instructions. It also gave me insight into how students approached this type of learning as I kept the groups small (7-8 students). These few photos show the work product of 5 and 6yr olds.
Teacups made with direct modelling, bisque fired and painted with tempera:


I followed up this round of clay lessons with an independent one where students were given a similar sized ball of clay and free reign to invent their own creation.
This lesson revealed deeper conceptual understandings, like generating original ideas, converging on one strong idea, technical skill retention, problem solving, independence, innovation and self-evaluation. It needs to be restated that students had been exploring with modelling clay as one of their independent centres.

Own choice:
Stencil hearts layered into a cake and finger painted

Variety - easy to tell work apart
Duck in the reeds
Kiwi with fern leaf and grubs
 Seal and Lion
Tiger
Here is a video I made of the lesson for students to review skills before going into the individual clay centre. I played it on our large TV screen for the class as the 5min warm up at the start of the independent clay lesson. Muting the voice-over, I asked students to recall the learnings as the video played. The voice-over is there to help when they return next year and wish to review their learnings.

Willemse T. (2018). Basic techniques for clay. Clay Teacup. Youtube.

Stay tuned for posts about how I applied and adapted this process to my older year levels and what I observed.


Thank you for stopping by,
With love, Te Aroha
Timea
http://www.help-me-learn.com/
http://www.teacherspayteachers.com/Store/One-Teachers-Journey
http://www.teachersnotebook.com/shop/tkwillemse https://twitter.com/TimeaWillemse http://www.youtube.com/user/HelpMeLearnMaths
http://pinterest.com/tkwillemse/boards/
https://www.instagram.com/timea_oneteachersjourney/

Exploring strategies for teaching creative thinking Part 1

When I first starting to expand my understanding about the value-add that a focus on creative thinking could bring to my students' development, I didn't believe that turning my whole programme on its head would be the best way to go about applying my learnings. Instead, I ran trials based on research from literature to infuse creative thinking into our lessons and noted how the students responded?

Continuing with my summary of
Lai, E. R., Yarbro, J., DiCerbo, K., & de Geest, E. (2018). Skills for Today: What We Know about Teaching and Assessing Creativity. London: Pearson.

I pulled ideas from this research on ways to teach Creative Thinking in the classroom, and will share ways I have put this into practice over the next few posts. I hope you find something useful to apply in your lessons too.

Problem-Solving Training:

There is some compelling evidence for the positive impact of problem-solving training on creativity. Alfonso-Benlliure, Meléndez, and García-Ballesteros (2013) examined an intervention of six weekly, one-hour training sessions with PK-K. These sessions taught cognitive problem-solving processes including problem-finding, problem formulation, idea generation, and idea evaluation through games and exercises, including pretend and imaginative play.
Students who received the intervention experienced gains in creativity which could be seen during drawing tasks when compared to the control group.

Kurtzberg and Reale (1999) developed a problem-solving intervention based on Torrance’s Future Problem-Solving (FPS) process (Torrance, 1978), for 8th Graders.
Individuals are presented with a “fuzzy situation” (i.e. an ill-defined, real-world problem that might be faced by future generations). This intervention focused on the problem-identification step, which involves brainstorming as many problem statements as possible that can be used to understand the fuzzy situation. Within the context of a physical science lesson on solar energy, students were taught strategies for brainstorming and were given lists of potential problem categories to help expand their list of problem statements.

Problem-identification skills were measured based on the students’ responses to other fuzzy situations. Students received scores based on
a) the number of problems identified,
b) number of problems identified that were relevant to the situation (fluency), and
c) number of different problem categories identified (flexibility).

Results indicated that the intervention positively impacted all four facets of problem-identification skills (process of identifying differences), when compared to the control.
John Bransford - ideal problem solving model (2104)


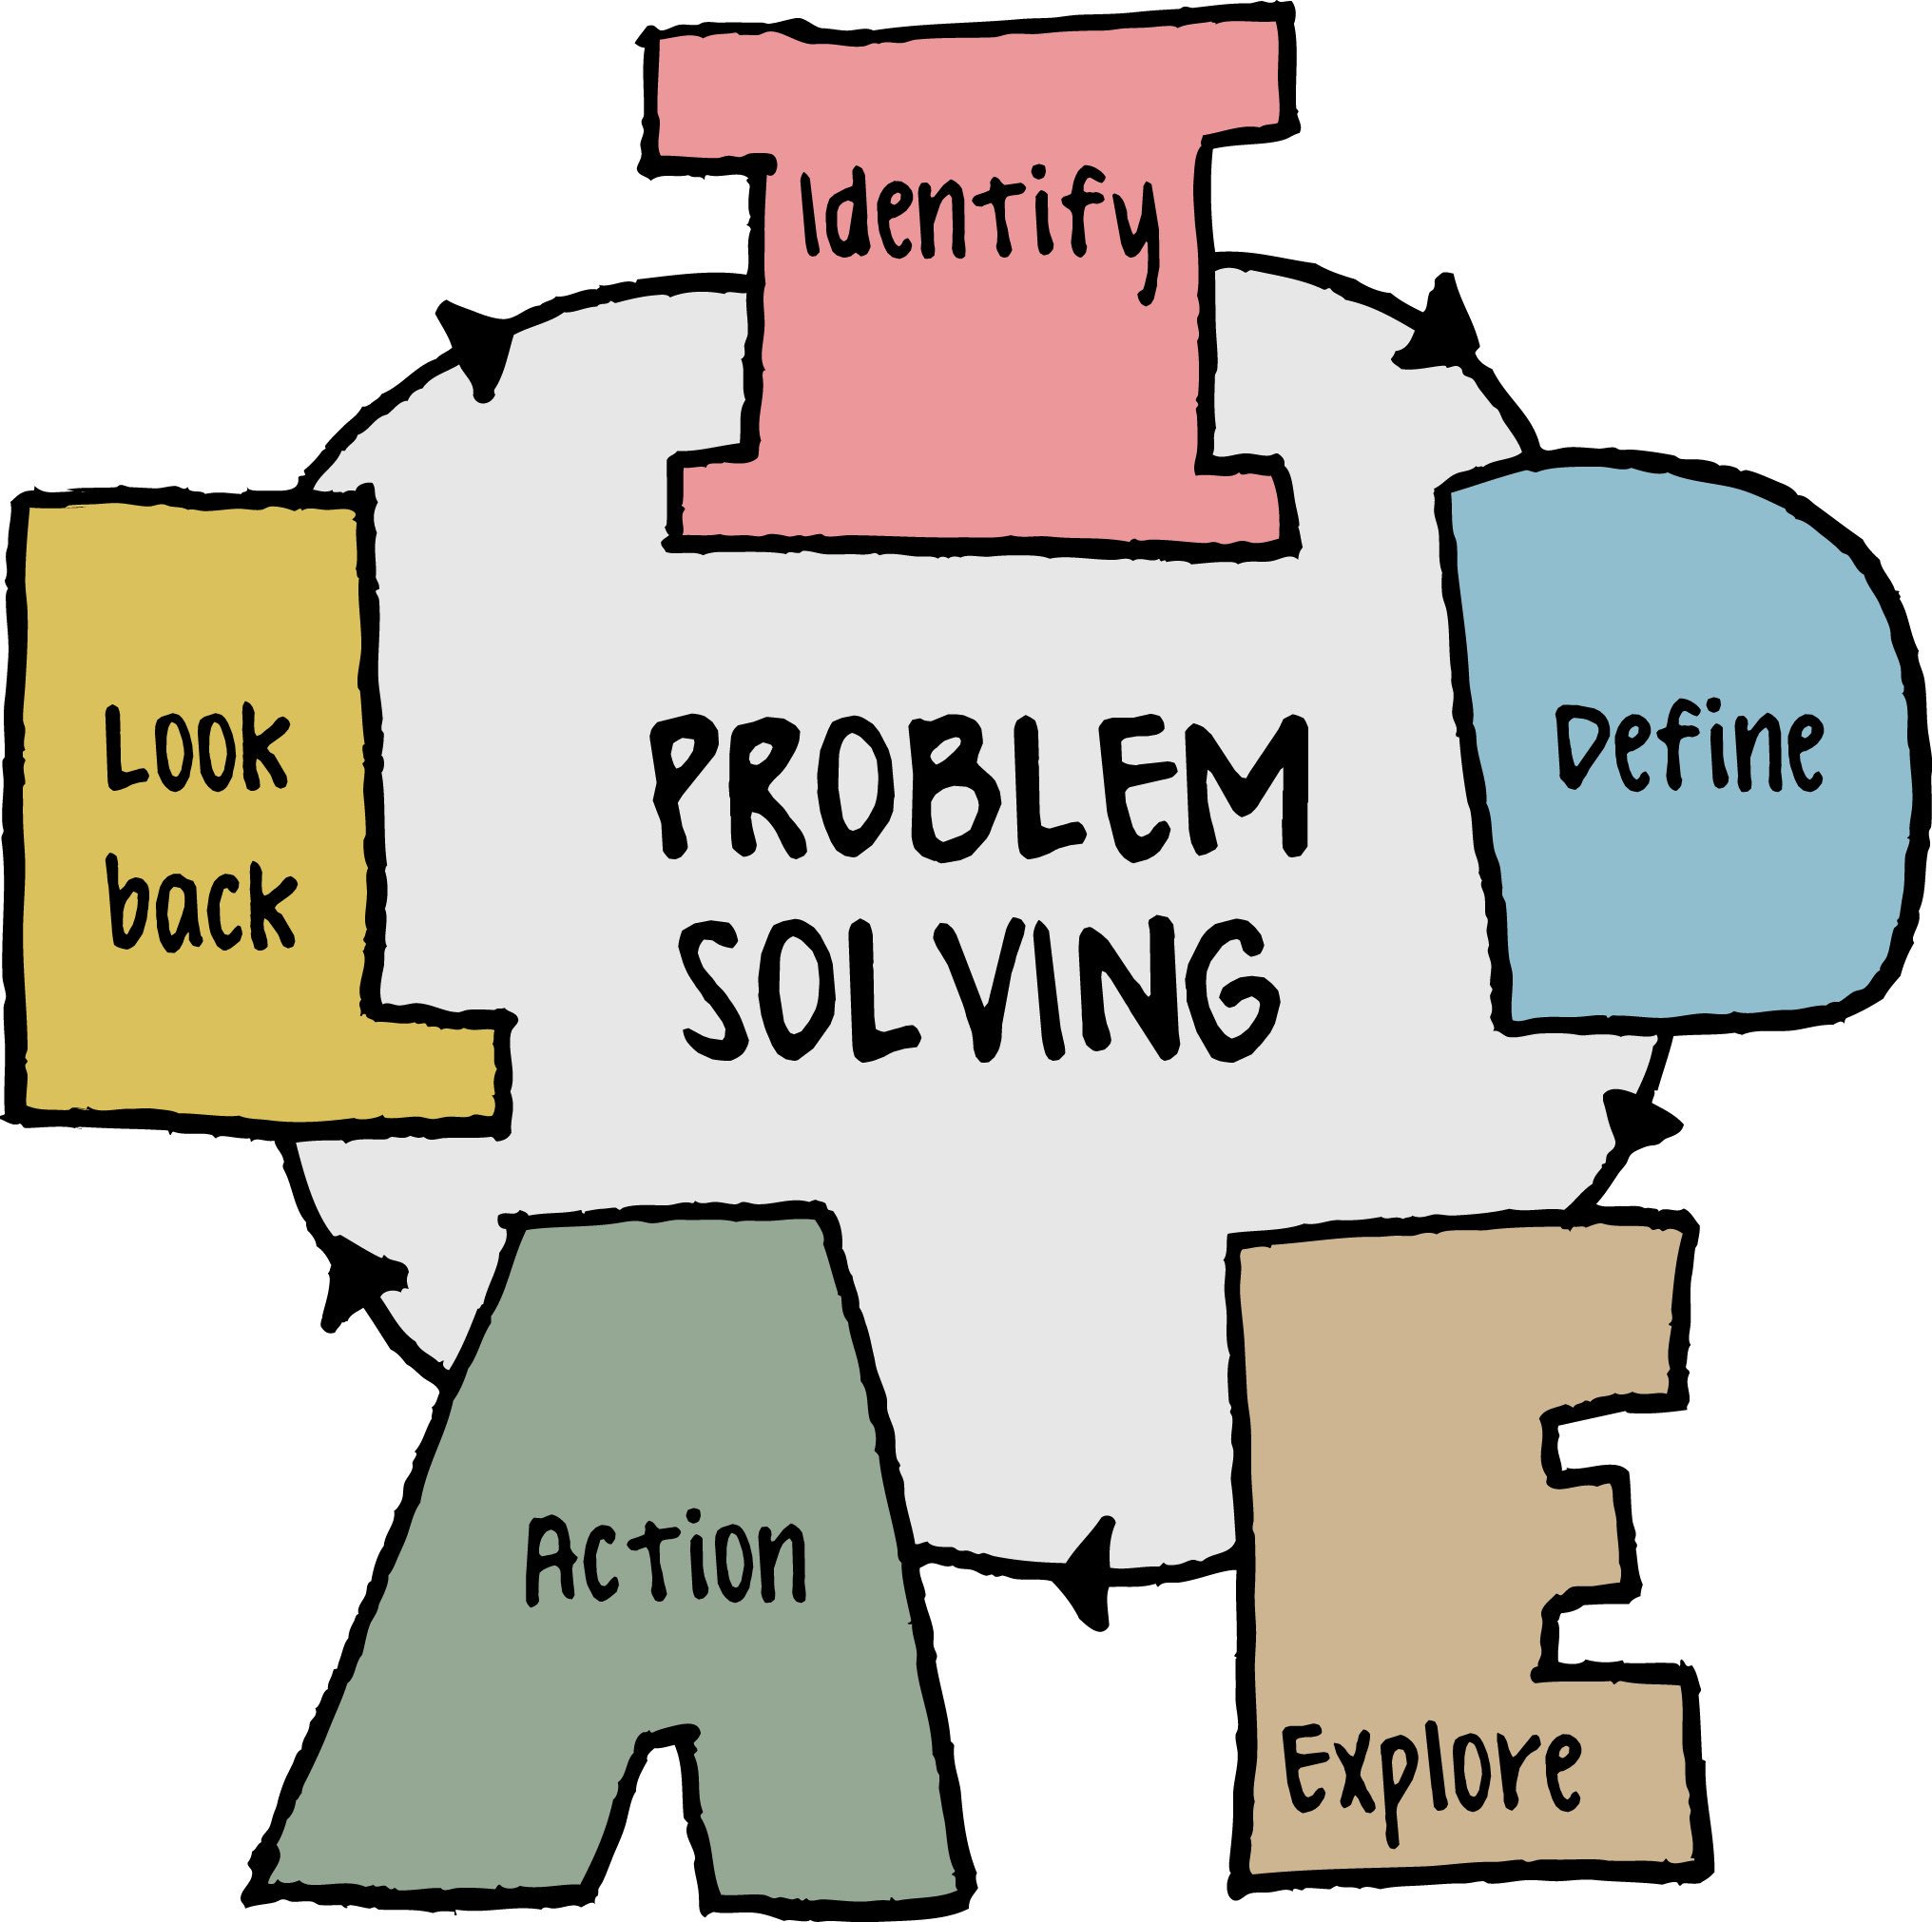
John Bransford (2014) developed the IDEAL problem solving model.
Identify the problems and opportunities
Define the problem and alternative goals
Explore possible solutions and strategies
Apply solutions by acting on strategies
Look at effects, evaluate and learn

So how did I implement this strategy?
The first step is to change your own mindset. As teachers we are so used to problem-solving - all day long we are faced with resolving hundreds of problems and this naturally flows over into solving the problems (and potential problems) our students face. 
We become adept at removing obstacles before they are encountered with the good intentions of smoothing the pathway to success. The flip side of this is that we grow students who lack opportunity to develop GRIT.


Grit: the power of passion and perseverance by Angela Lee Duckworth
(TED Published on May 9, 2013)


Rather than providing solutions, seek to provide (even better - co-construct with the students) strategies that they can turn to when faced with problems. We are great at doing this for maths problem solving, or decoding in reading, but we truly need it for all aspects of life.  

The art room is a fantastic place to develop this character trait in students. By building the opportunity to see what fails, into your lessons,  and taking those learnings into the next stages of design, students become comfortable with ambiguity and trialling ideas. They should seek to discover before converging on a singular plan. In my classroom we overtly identify this in 2 of our Design Thinking stages, ideation and  prototyping.

My Design Thinking Process wall with posters for Y4-6 students (9-11yrs)


 My Design Thinking Process wall with posters for Y1-3 students (5-8yrs)

During the Visualisation or Many Choices stage, students are given opportunity to (roughly) plan out multiple ideas on their chosen perspective. They get time to discuss all these ideas with other students, answer questions about their proposals, then receive and evaluate feedback. On the flip-side they get to observe and listen to the ideation of others and to develop their critical thinking skills when analysing and providing feedback on a variety of proposals. 

This also helps them become more open-minded to divergent thinking. I encourage students to seek feedback from someone other than their close friends, as the chances of it being more challenging and divergent to their way of thinking are higher and they could have a better chance of having their ideas challenged, pushed further or improved on. But I don't tell them who to go with. They self select at the level of divergence that they are comfortable with.

This short video shows Y2 students (5-6yrs) giving and receiving feedback. At times I modify slightly by asking the buddy to interpret the drawing before the artist explains it. This is based purely on the visual clues that the artist has included in their work. The purpose of this is to teach young artists about the power of non-verbal communication that art embodies. They learn how important it is to include detail and to aim for accuracy.

With older students it morphs into leaving more subtle clues so that the viewer can interpret the message without it being obvious. This links beautifully with the reading comprehension skill and sophisticated writing skill of inference.


** This video has been augmented with the CLIPS app to protect student identity.

Prototyping, the Test and Improve stage, can follow on, or run parallel with convergence - the narrowing down to a singular idea or plan for execution. I give students time to 'play' with media. to experiment with techniques and effects that they are envisioning for their plan. 

There is never going to be enough time in a curriculum to teach all the possible skills and techniques, for all the range of media available, at all the levels of development in a single class. By letting children play and experiment with what they are drawn to, they learn the things they personally want to find out. 
Because they have a vision that they developed and are strongly connected with, they will persevere, seek advice, trial and evaluate, experience what I call 'happy accidents' and may even return to their plan and modify it again. 


** This video has been augmented with the CLIPS app to protect student identity.

The amount of observational assessment that this 'play' segment yields is astounding, especially when combined with insights through student voice in the form of reflections.

Examples of student voice recorded on Seesaw, shared with parents.


In my next post, I will be exploring the learning/teaching technique of modelling and the impact it has on students' creativity levels.


Thank you for stopping by,
With love, Te Aroha
Timea
http://www.help-me-learn.com/
http://www.teacherspayteachers.com/Store/One-Teachers-Journey
http://www.teachersnotebook.com/shop/tkwillemse https://twitter.com/TimeaWillemse http://www.youtube.com/user/HelpMeLearnMaths
http://pinterest.com/tkwillemse/boards/
https://www.instagram.com/timea_oneteachersjourney/

ShareThis